What is this post about
This post is basically about how to create your own container program using C. In this article we are going to review the technology and principles that make the isolation of processes a reality in Linux, the steps are based on this excellent talk by Liz Rice.
Why C
Because I love the simplicity of the language (maybe I’m just a romantic) and also it is the lingua franca of Linux, which means that it helps to get a better understanding about how things work at a system level.
Why you might care about it
I’ve always loved to learn how stuff works behind the scenes. I’ve wrote this article for people that share the same curiosity. Also knowing how it works can help you respond to typical questions, such as “Can I run a binary from another CPU architecture in a container?”, “Is there any performance penalty?”, “What’s the difference between containers and VM?” and so on.
Hello World!
Enough with the introduction let’s write our container, in other words, a program that isolates other programs. We are going to start by writing the obligatory Hello World.
#include <iostream>
int main() {
  printf("Hello, World! \n");
  return EXIT_SUCCESS;
}
To compile the code, we just call:
g++ container.cc -o container
This will generate our binary called container, that we can now execute by doing:
./container
# Hello World!
How to create a process
The first functionality we need to implement in our program is a way to execute other programs, but when you execute a program in Linux the program takes control of the process, which means you are no longer in control, to solve this we are going to create a new process and execute the program there.
Right now our process looks like this:
  +--------+
  | parent |
  |--------|
  | main() |
  +--------+
To create a new process we need to clone the actual process and provide a function to be executed in it. Let’s start by writing the function, we’ll call it jail.
int jail(void *args) {
  printf("Hello !! ( child ) \n");
  return EXIT_SUCCESS;
}
Now our process will look something like this:
  +--------+
  | parent |
  |--------|
  | main() |
  |--------|
  | jail() |
  +--------+
Our next step is to invoke the system call to create the child process, for this we are going to use the clone system call.
For the clone system call to work we need to provide some memory for the new process to run, for this we are going to create a function that allocate some memory for us:
char* stack_memory() {
  const int stackSize = 65536;
  auto *stack = new (std::nothrow) char[stackSize];

  if (stack == nullptr) {
    printf("Cannot allocate memory \n");
    exit(EXIT_FAILURE);
  }

  return stack+stackSize;  //move the pointer to the end of the array because the stack grows backward.
}
Here we are going to provide some arbitrary memory size 65K bytes, after we allocate this memory we are going to return a pointer to the end of the array. This is required because when clone load this process the stack (the memory the process need to run) grows backward.
Our final version will look like this:
#include <iostream>
#include <sched.h>
#include <sys/types.h>
#include <unistd.h>
#include <sys/wait.h>

char* stack_memory() {
  const int stackSize = 65536;
  auto *stack = new (std::nothrow) char[stackSize];

  if (stack == nullptr) {
    printf("Cannot allocate memory \n");
    exit(EXIT_FAILURE);
  }

  return stack+stackSize;  //move the pointer to the end of the array because the stack grows backward.
}

int jail(void *args) {
  printf("Hello !! ( child ) \n");
  return EXIT_SUCCESS;
}

int main(int argc, char** argv) {
  printf("Hello, World! ( parent ) \n");

  clone(jail, stack_memory(), SIGCHLD, 0);

  return EXIT_SUCCESS;
}
The first parameter is our entry point function, second parameter is our function to allocate memory, third (SIGCHLD) this flag tells the process to emit a signal when finished and the fourth and last one is only necessary if we want to pass arguments to the jail function, in this case we pass just 0.
  +--------+             +--------+
  | parent |             |  copy  |
  |--------|             |--------|
  | main() |  clone -->  | jail() |
  |--------|             +--------+
  | jail() |
  +--------+
After creating the new process we need to tell the parent process to wait until the child finishes execution, otherwise the child can become a zombie. The wait system call does just that.
wait(nullptr); //wait for every child.
The updated code will look like this:
#include <iostream>
#include <sched.h>
#include <sys/types.h>
#include <unistd.h>
#include <sys/wait.h>

int jail(void *args) {
  printf("Hello !! ( child ) \n");
  return EXIT_SUCCESS;
}

int main(int argc, char** argv) {
  printf("Hello, World! ( parent ) \n");

  clone(jail, stack_memory(), SIGCHLD, 0);
  wait(nullptr);
  return EXIT_SUCCESS;
}
Compile and execute.
./container
#Hello, World! ( parent )
#Hello !! ( child )
Here our program sends the first greeting (parent), then we clone the process and run the jail function inside and it ends up printing a greeting as well.
Running programs
It’s time to load a real program. Let’s chose shell, so we can test what’s happening inside our container. To load a program we are going to use execvp, this function will replace the current process in this case, the child with a instance of the program.
execvp("<path-to-executable>", {array-of-parameters-including-executable});
The syntax to run the program will look something like this:
char *_args[] = {"/bin/sh", (char *)0 };
execvp("/bin/sh", _args);
To keep it simpler and reusable we can wrap it into a function.
//we can call it like this: run("/bin/sh");
int run(const char *name) {
  char *_args[] = {(char *)name, (char *)0 };
  execvp(name, _args);
}
This version is enough for our purposes, but it doesn’t support multiple parameters, so just for fun I wrote this alternative version that accepts multiple parameters using some C++ templates black magic.
//we can call it like this: run("/bin/sh","-c", "echo hello!");
template <typename... P>
int run(P... params) {
  //basically generating the arguments array at compile time.
  char *args[] = {(char *)params..., (char *)0};
  return execvp(args[0], args);
}
Now that we have defined our function, we should update the entry point function for our child process.
int jail(void *args) {
  run("/bin/sh"); // load the shell process.

  return EXIT_SUCCESS;
}
We compile/run this:
process created with pid: 12406
sh-4.4$
Environment variables
After playing around with sh we are noticing that is far from being isolate. To understand how changing the execution context changes how the underlying process behave, we are going to run a simple example by clearing the environment variables for the sh process.
This is easy we just need to clear the variables before passing the control to /bin/sh. We can delete all the environment variables for the child context using the function clearenv.
int jail(void *args) {
  clearenv();   // remove all environment variables for this process.

  run("/bin/sh");
  return EXIT_SUCCESS;
}
We run the code again and inside the shell we run the command env:
  # env
  SHLVL=1
  PWD=/
Not bad, we solved the information leak from the guest and we are able to observe that performing changes in the context of the child process stays local to the child process.
Linux namespaces
Universal Time Sharing
Imagine a scenario where we have to deal with a program that needs to change the host name of the machine to work, if you execute this program in your machine it can mess with other programs like for example your network file sharing services. Imagine that somebody gives us the task to look for the most efficient way to do this, the first option that comes to mind is using a VM, but we need to provision the VM (Memory, Storage, CPU, etc..), install the OS, etc. It can take a couple of hours. It won’t be nice if your Operative System can deal with that isolation for you? This is where Linux Namespaces come into the picture.
Here is a quick illustration.
                 Linux Kernel
 +-----------------------------------------------+

    Global Namespace's { UTS, PID, MOUNTS ... }
 +-----------------------------------------------+

         parent                   child process
  +-------------------+            +---------+
  |                   |            |         |
  | childEntryPoint() | clone -->  | /bin/sh |
  |                   |            |         |
  +-------------------+            +---------+
All the processes in the system share the same UTS Namespace.
This is what we want:
                  Linux Kernel
 +-----------------------------------------------------+

  Global Namespace { UTS, ... }              UTS
 +-----------------------------+      +----------------+

         parent                         child process
  +-------------------+                  +---------+
  |                   |                  |         |
  |      jail()       |    clone -->     | /bin/sh |
  |                   |                  |         |
  +-------------------+                  +---------+
To get a copy of the global UTS for our child process we simply pass the CLONE_NEWUTS flag to clone, the updated code will look like this:
int jail(void *args) {
  clearenv();   // remove all environment variables for this process.
  run("/bin/sh");
  return EXIT_SUCCESS;
}

int main(int argc, char** argv) {
  printf("Hello, World! ( parent ) \n");

  clone(jail, stack_memory(), CLONE_NEWUTS | SIGCHLD, 0);
  #                           ^^ new flag
  wait(nullptr);
  return EXIT_SUCCESS;
}
Now lets prove our hypothesis, we recompile and execute our program:
./container
error: clone(): Operation not permitted
This happens because what we’re trying to do (cloning the UTS namespace) requires CAP_SYS_ADMIN, or in other words; we need elevated privileges.
sudo ./container
[sudo] password for cesar:
process created with pid: 12906
sh-4.4#
It works! Now let’s see what happen when we modify the host name:
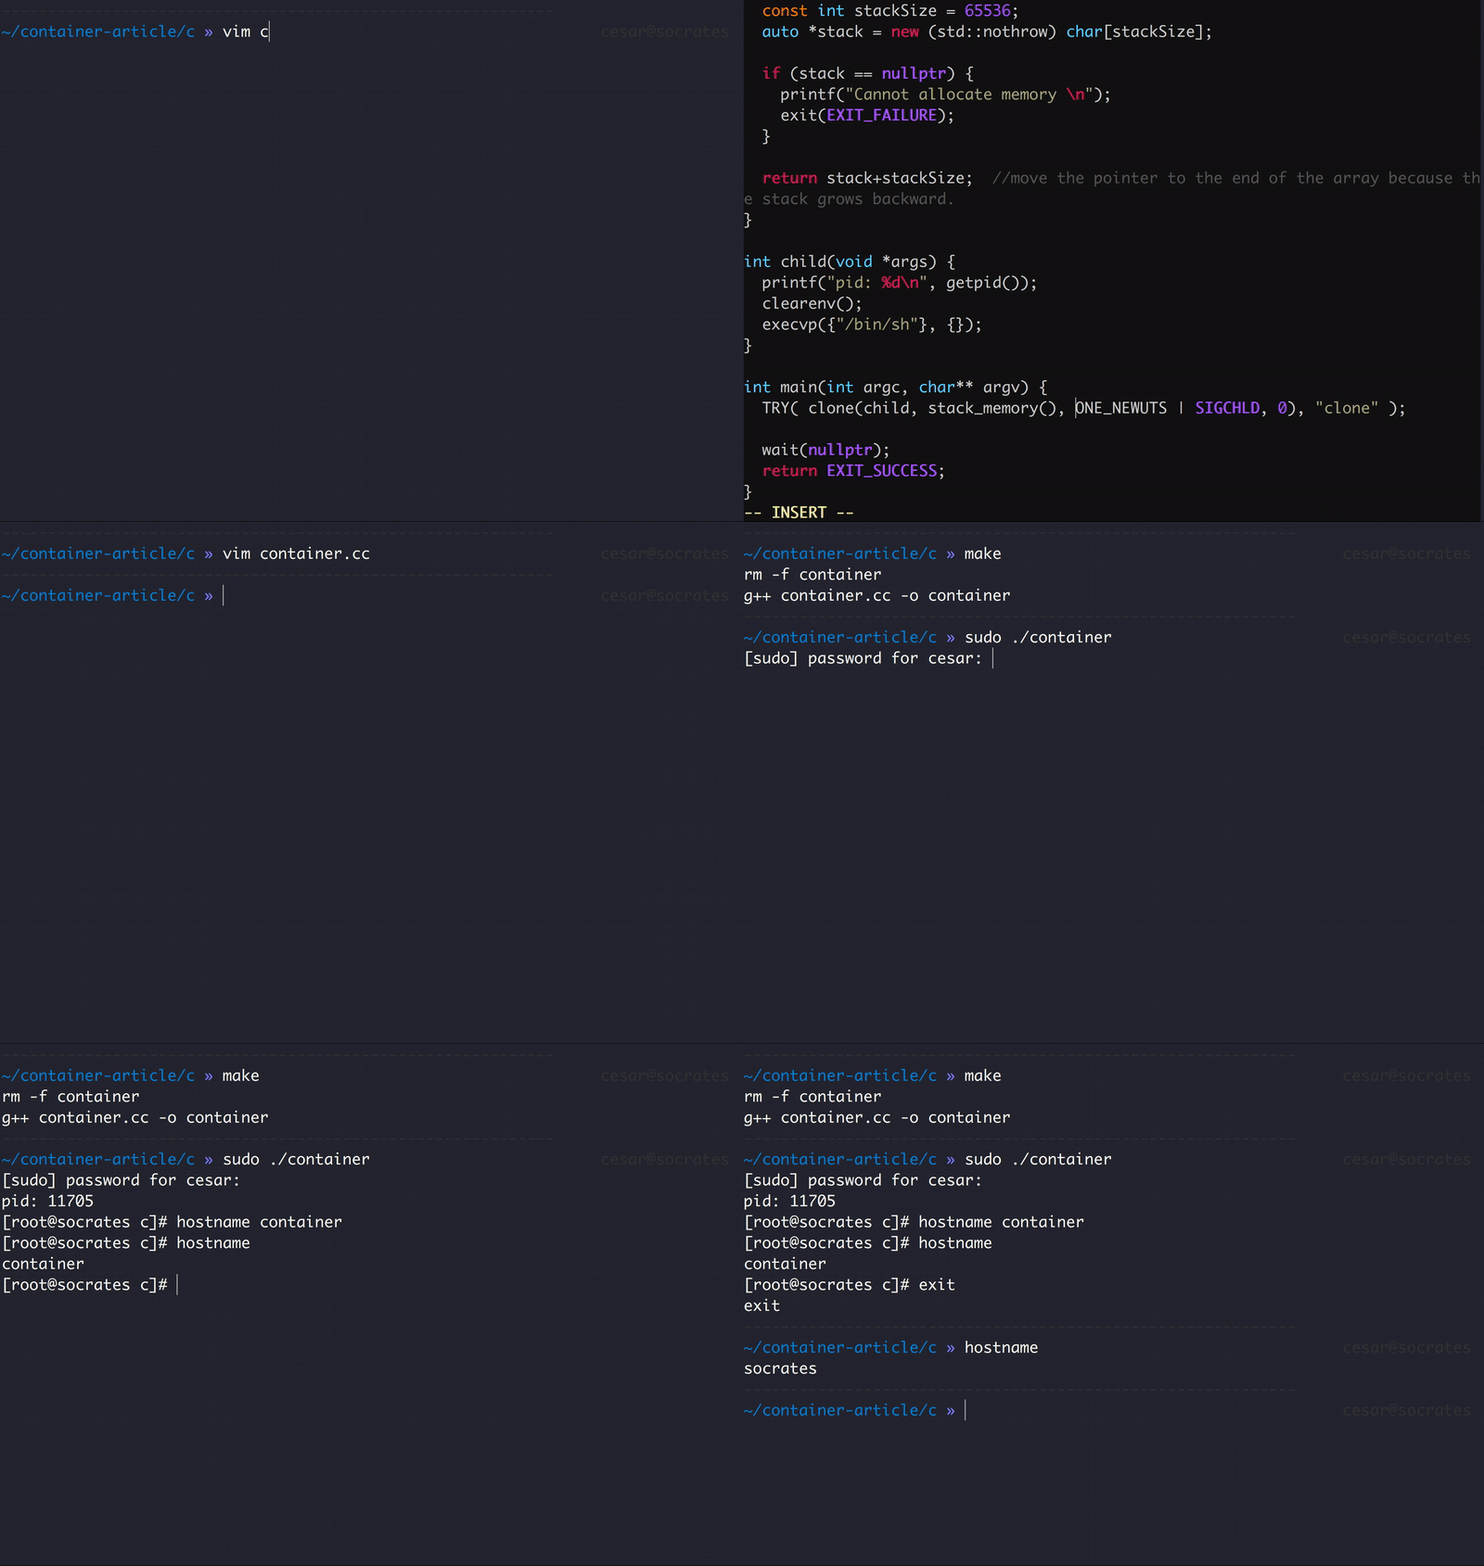
New Process Tree
This time we are going to isolate our shell process from the rest of the processes, from it’s point of view it will be running solo in the machine, this one like the example above requires to pass just a flag CLONE_NEWPID in this case. To illustrate the effect of this flag we are going to display the process identifier using getpid:
int jail(void *args) {
  clearenv();
  printf("child process: %d", getpid());
  run2("/bin/sh");
  return EXIT_SUCCESS;
}

int main(int argc, char** argv) {
  printf("Hello, World! ( parent ) \n");
  printf("parent %d", getpid());

  clone(jail, stack_memory(), CLONE_NEWPID | CLONE_NEWUTS | SIGCHLD, 0);
  #                            ^^ new flag
  wait(nullptr);
  return EXIT_SUCCESS;
}
Compile and run:
sudo ./container
parent pid: 3306
child pid: 1
/ #
As you can observe the child PID is 1, from the child process’s perspective, it is the only process in the machine. Now let’s see if we can still see other processes in the system by executing ps.
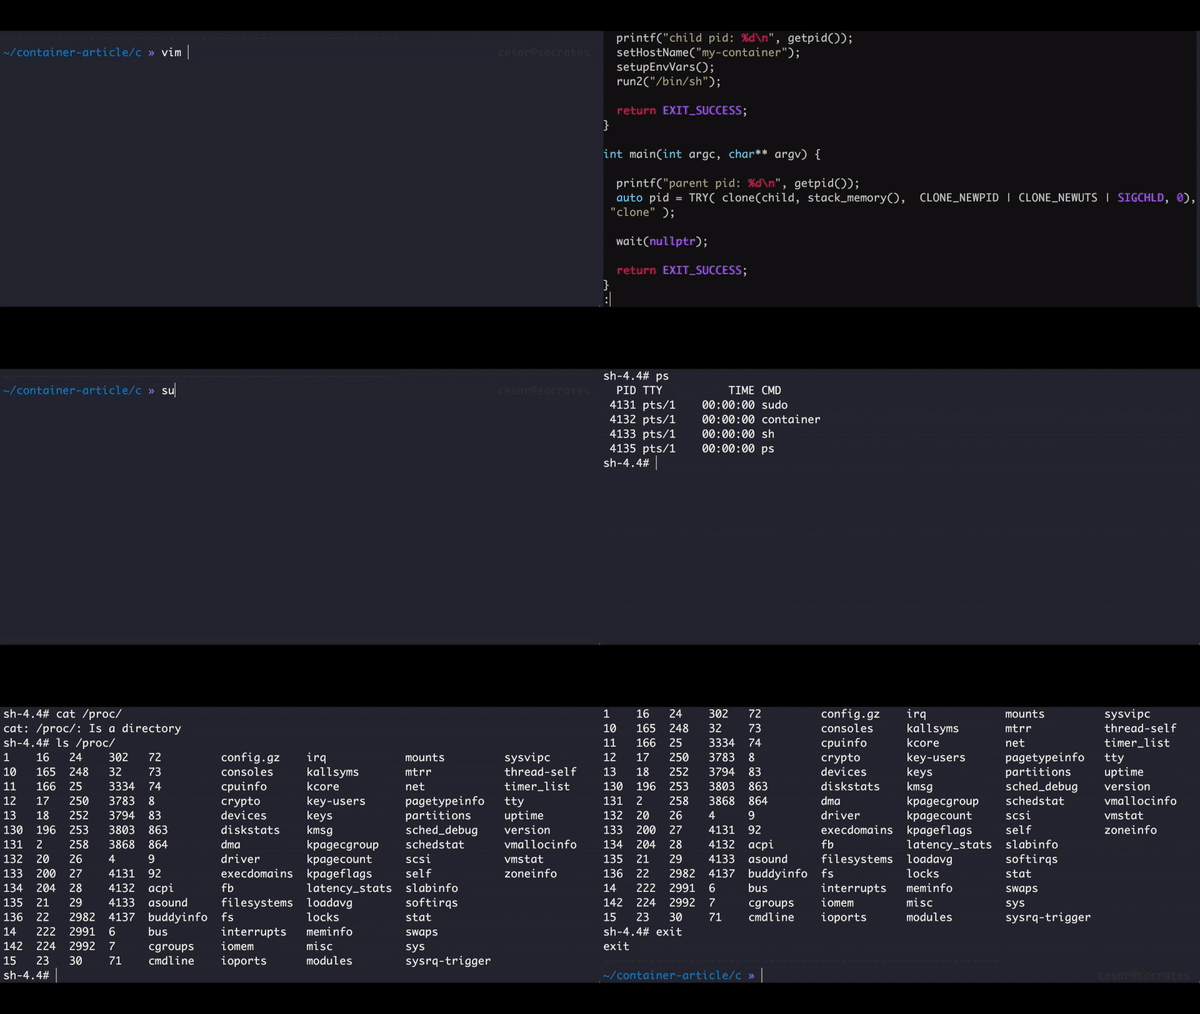
We are still able to list other processes in the system, but this is because our process and it’s child ps still have access to the /proc folder, in the next section we are going to learn how to isolate the folders our process can access.
Isolating A File System
Changing The Root
This one is easy we just want to change the root folder of our process using chroot. We basically can select a folder and isolate our process inside that folder in such a way that (theoretically) it cannot navigate outside. I drew this illustration to show what we will try to achieve.
   folders our process can access
    ----------------------------
                 a
                 |
              b --- c
              |
             ----
             |  |
             d  e
The root here is represented by a, you can navigate all the way from a to e. If you execute chroot("b") we’ll end up with this tree.
   folders our process can access
    ----------------------------
                b
                |
               ----
               |  |
               d  e
Now we only can traverse from b to e or d, that’s the point behind changing the root, we can save sensitive files in a because the process cannot escape from b.
Let’s write the necessary code to change the root.
void setup_root(const char* folder){
  chroot(folder);
  chdir("/");
}
For this we are going to hide the complexity behind a function called setupFileSystem then we change the root of the folder using chroot and last but not least tell the process to jump to the new root folder.
Preparing The Root Folder
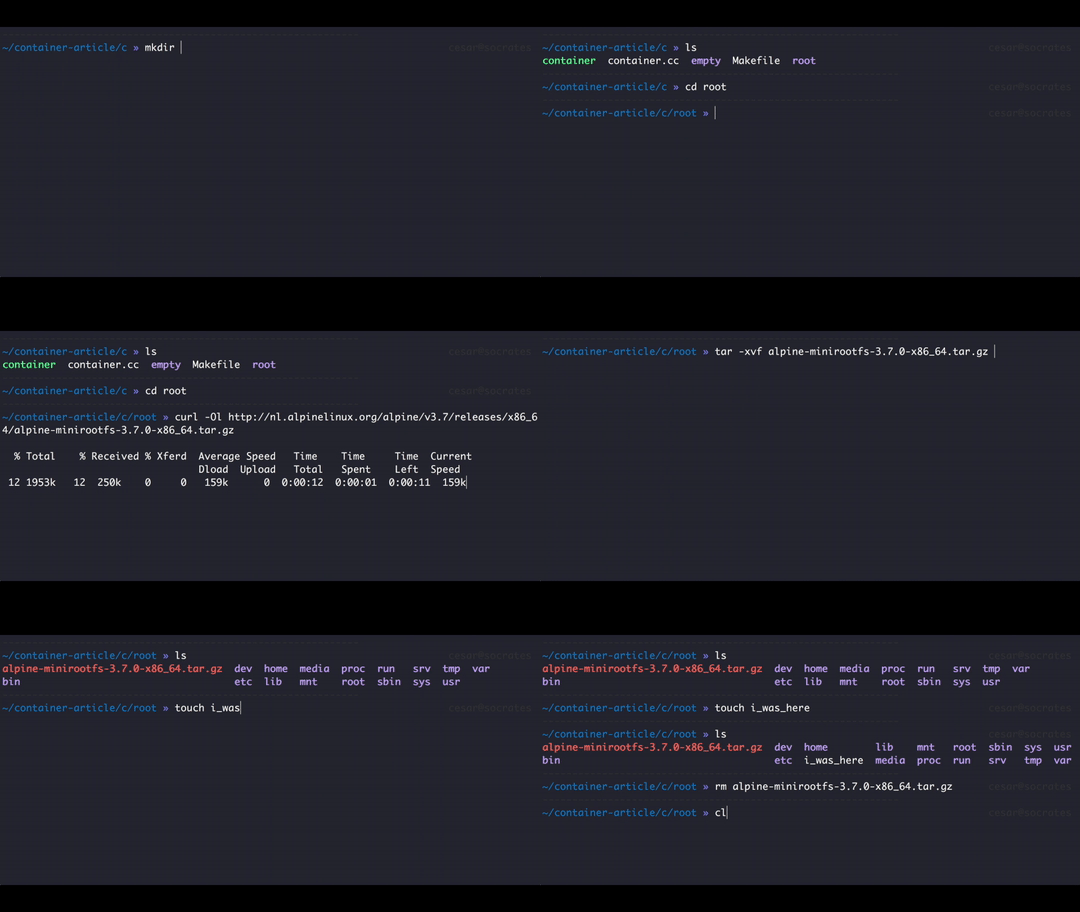
We can change the root to an empty folder but if we do that we are going to lose the tools we are using so far to inspect the quality of our container (ls, cd, etc..), to avoid this we need to get some Linux base folder that include all these tools. I’ll choose Alpine Linux because is very lightweight.
Just grab the base install.
mkdir root && cd root
curl -Ol http://nl.alpinelinux.org/alpine/v3.7/releases/x86_64/alpine-minirootfs-3.7.0-x86_64.tar.gz
Uncompress into a folder called root at the same level as our binary.
tar -xvf alpine-minirootfs-3.7.0_rc1-x86_64.tar.gz
Configuration
Also we want to setup some environment variables to help shell to find the binaries and to help other processes to know what type of screen we have, we are going to replace clearenv with a function that takes care of those tasks.
void setup_variables() {
  clearenv();
  setenv("TERM", "xterm-256color", 0);
  setenv("PATH", "/bin/:/sbin/:usr/bin:/usr/sbin", 0);
}
Coding
This is the how the code looks after we implemented the functions:
void setup_variables() {
  clearenv();
  setenv("TERM", "xterm-256color", 0);
  setenv("PATH", "/bin/:/sbin/:usr/bin:/usr/sbin", 0);
}

void setup_root(const char* folder){
  chroot(folder);
  chdir("/");
}

int jail(void *args) {
  printf("child process: %d", getpid());

  setup_variables();
  setup_root("./root");

  run("/bin/sh");
  return EXIT_SUCCESS;
}

int main(int argc, char** argv) {
  printf("parent %d", getpid());

  clone(jail, stack_memory(), CLONE_NEWPID | CLONE_NEWUTS | SIGCHLD, 0);
  wait(nullptr);
  return EXIT_SUCCESS;
}
Now let’s see the code in action:
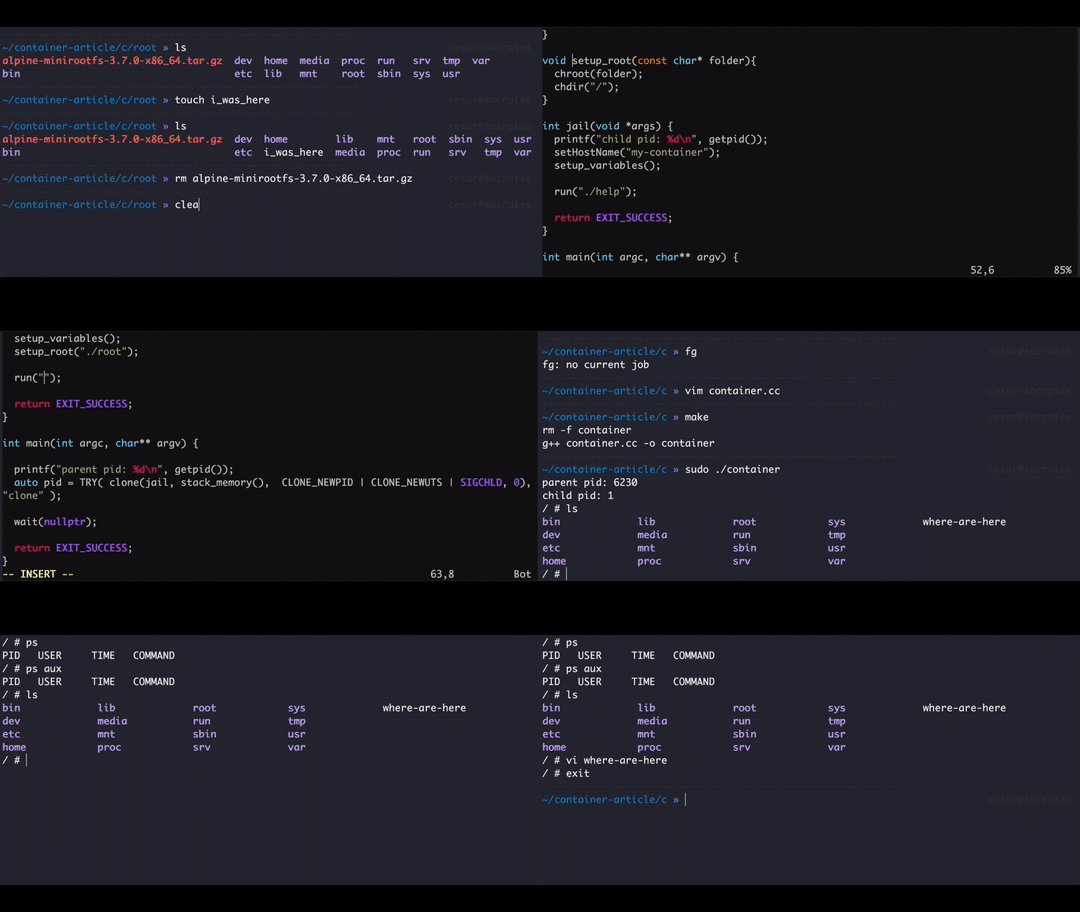
Now we no longer see the processes with ps, this is because we replaced the general /proc folder with the one that came with alpine which by default is an empty directory, in the next section we are going to mount the proc file system.
Mounting File Systems
Mounting a file system is like exposing the content of a device like a disk, network or other entities by using the folder and files metaphors. In simple terms that’s what is. To mount something in Linux we need a resource that understands this metaphor like procfs and a folder, we are going to choose the folder /proc that comes with the alpine distribution.
To mount a file system in Linux we can use the mount system call. This call requires the following parameters to work:
mount("proc", "/proc", "proc", 0, 0);
The first parameter is the resource, the second is the folder destination and the third parameter is the type of file system, in this case procfs.
Implementing the code is simple we just add the same line as above after we configure the chroot:
int jail(void *args) {
  printf("child process: %d", getpid());

  setup_variables();
  setup_root("./root");

  mount("proc", "/proc", "proc", 0, 0);

  run("/bin/sh");
  return EXIT_SUCCESS;
}

int main(int argc, char** argv) {
  printf("parent %d", getpid());

  clone(jail, stack_memory(), CLONE_NEWPID | CLONE_NEWUTS | SIGCHLD, 0);
  wait(nullptr);
  return EXIT_SUCCESS;
}
Unmount
Every time we mount a file system it is always good practice to release what we don’t use. To release the binding we use unmount.
umount("<mounted-folder>")
We are going to unmount just before our contained process exits:
  mount("proc", "/proc", "proc", 0, 0);

  run("/bin/sh");

  umount("/proc");
  return EXIT_SUCCESS;
There is a small challenge here, that wasn’t obvious for me the first time. Every time we call run our process gets replaced by a new process image and we won’t be able to call umount, basically the instructions are going to stop in run and from there sh is in control and we can forget about the last two instructions.
The solution to this is to decouple this program loading from the rest of the child function. As we learned above, to run a function in a separated process in Linux we use clone. Let’s make use of this knowledge and re-factor our code.
Let’s start by grouping our process creation instructions into a reusable function:
int main(int argc, char** argv) {
  printf("parent %d", getpid());

  clone(jail, stack_memory(), CLONE_NEWPID | CLONE_NEWUTS | SIGCHLD, 0);
  wait(nullptr);

  return EXIT_SUCCESS;
}
We can rewrite these two instructions into a nicer interface:
template <typename Function>
void clone_process(Function&& function, int flags){
 auto pid = clone(function, stack_memory(), flags, 0);

 wait(nullptr);
}
Here, I’m using a C++ template to create a new “generic type” called Function which will morph into a C function, then we pass the function to clone, also we pass the flags as an integer.
To use our function we just re-write our main function:
int main(int argc, char** argv) {

  printf("parent pid: %d\n", getpid());
  clone_process(jail, CLONE_NEWPID | CLONE_NEWUTS | SIGCHLD );

  return EXIT_SUCCESS;
}
Nice, now let’s use this function to run our binary in a child-process:
int jail(void *args) {

  printf("child pid: %d\n", getpid());
  setup_variables();

  setup_root("./root");
  mount("proc", "/proc", "proc", 0, 0);

  auto runThis = [](void *args) ->int { run("/bin/sh"); };

  clone_process(runThis, SIGCHLD);

  umount("/proc");
  return EXIT_SUCCESS;
}
Let’s explain the changes:
auto runThis = [](void *args) ->int { run("/bin/sh"); };

clone_process(runThis, SIGCHLD);
Here we use a C++ feature called (Lambda) which basically is like an in-line function, the we plug it to our generic typed clone_process and the compiler do the rest.
Our final version looks like this:
int jail(void *args) {

  printf("child pid: %d\n", getpid());
  setHostName("my-container");
  setup_variables();

  setup_root("./root");

  mount("proc", "/proc", "proc", 0, 0);

  auto runThis = [](void *args) ->int { run("/bin/sh"); };

  clone_process(runThis, SIGCHLD);

  umount("/proc");
  return EXIT_SUCCESS;
}

int main(int argc, char** argv) {

  printf("parent pid: %d\n", getpid());
  clone_process(jail, CLONE_NEWPID | CLONE_NEWUTS | SIGCHLD );

  return EXIT_SUCCESS;
}
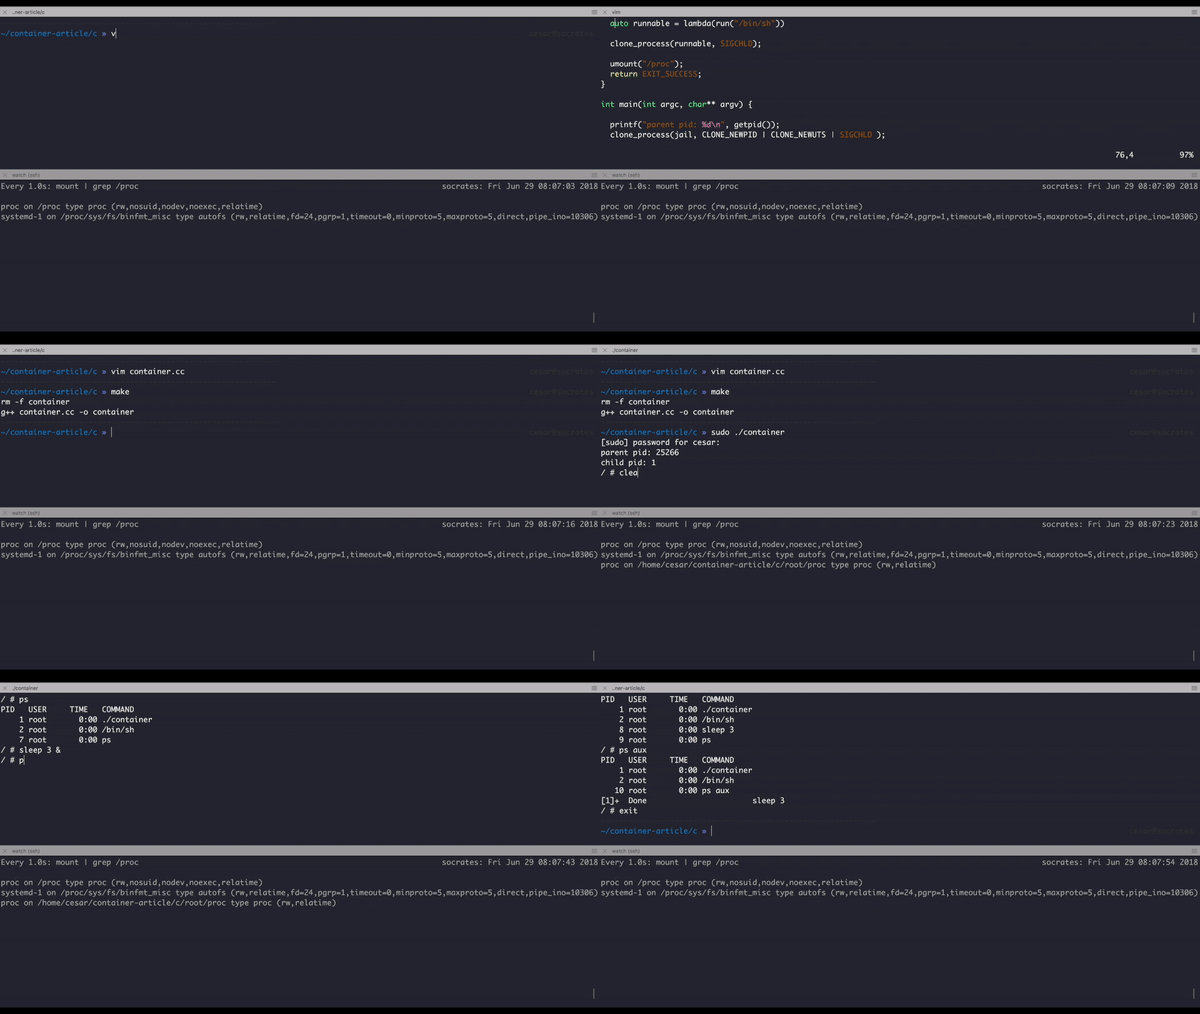
Now our program is capable of successfully mount procfs, release the file system after we exit and the best thing of all it can show the processes inside the container.

How it works
When we create the child process (jail) we use the flag CLONE_NEWPID, this flag gives our cloned process something like it’s own process tree.
This is how our system looks under normal conditions.
   Init-1
   ------
     |  child's
     |
 ----------------------
 |          |         |
systemd-2  bash-3   our-container-4
                      |
                    jail - 5
                      |
                    shell - 6
When we apply the flag CLONE_NEWPID this happens:
   Init-1
   ------
     |  child's
     |
 ----------------------
 |          |         |
systemd-2  bash-3   our-container-4
                      |
                     jail - 5
                      |
                    shell - 6
Nothing changes at a global scale, but from our process’s perspective we see the world like this:
   jail - 1
   ------
     |  child's
     |
   shell-2
Try to call ps inside this version and you will get the following:
PID   USER     TIME   COMMAND
    1 root       0:00 ./container
    2 root       0:00 /bin/sh
Moral of the story is when you clone the PID tree, your process is no longer able to track other processes but it still can track it’s child processes. You might wonder by looking the graph above that nothing has change in the global process tree after applying the flag and wonder if you can search the PID of isolated processes in the system, the answer is yes, for example if you run ps aux | grep sh you’ll be able to see your container. Here some homework try to run a contained process using this application or Docker and try to kill it from the outside.
Here is a small demo about locating the contained process:
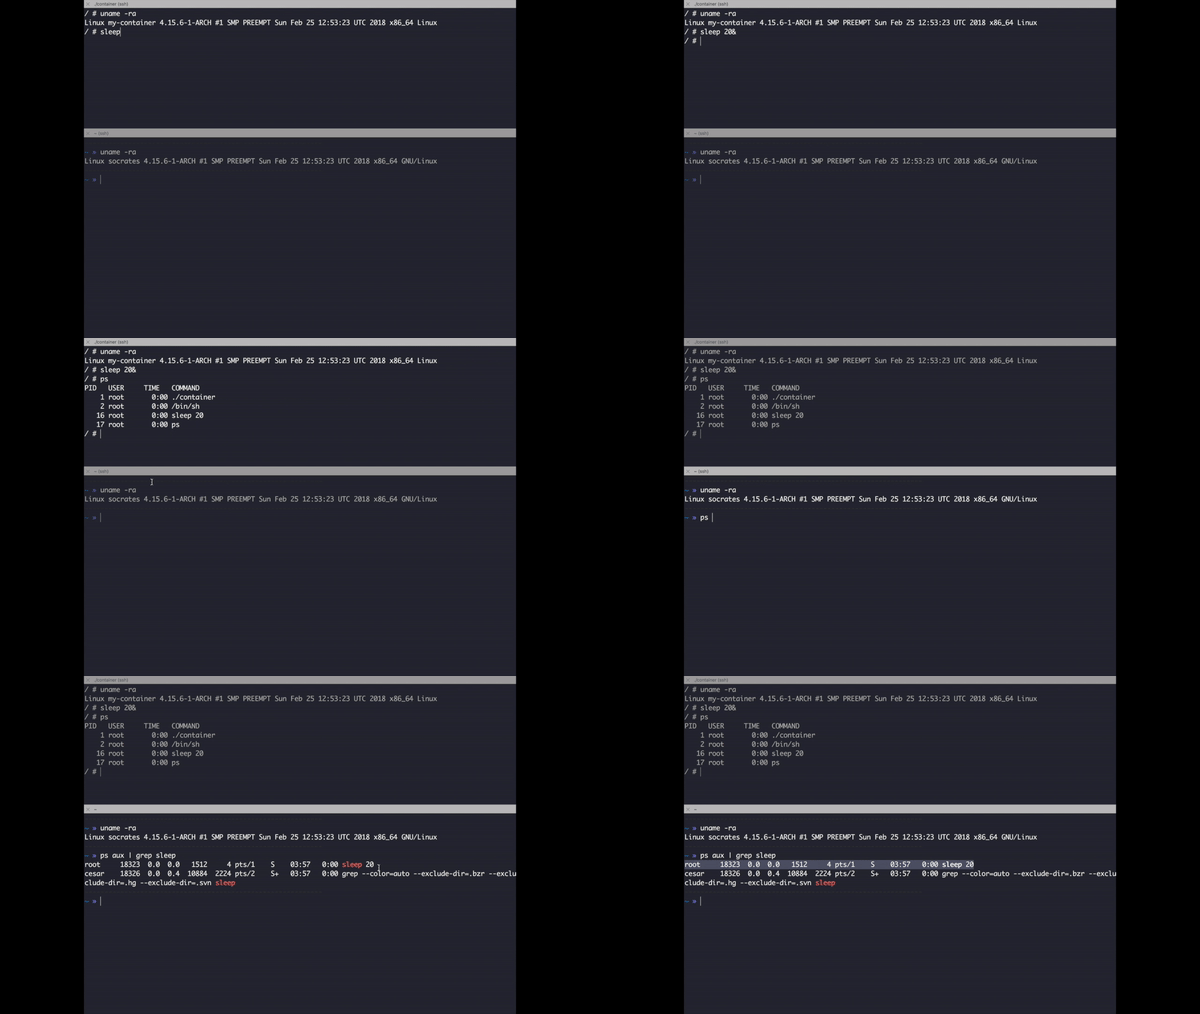
Check how sleep has a different PID inside the container and outside.
Control Group
Imagine now that we are given the task to contain a program from creating more processes, taking all the network bandwidth, consuming all the CPU time available. How do we guarantee that our contained applications live in harmony with other processes? To solve this type of problem Linux provides a feature called (Linux Control Group) or cgroup for short, which is a mechanism to distribute kernel resources between processes.
Limiting Process Creation
We are going to use cgroups to limit the amount of processes we can create inside our container, the control group called pids controller can be used to limit the amount of times a process can replicate itself, for example using fork or clone.
Before we start I’ll explain how we can interact with (Linux Control Group), you might have heard the phrase that in Linux “Everything is a file”, cgroup like procfs is another example of that philosophy. This means cgroup is a kernel feature that can be mounted like any other file system and interface with it using any I/O API or the applications you use to handle files. For this example I’ll use the Linux I/O interface by excellence which is open, write, read and close. Now the next step is to understand what folder or files we need to modify.
The control group file system directory is usually mounted here:
/sys/fs/cgroup
We want to limit the creation of processes, so we need to go to the pids folder.
/sys/fs/cgroup/pids/
Once we’re here, we can create a top folder that will encapsulate all the rules, it can have any acceptable folder name I’ll choose the name container.
/sys/fs/cgroup/pids/container/
Let’s write the code to create the folder:
#include <sys/stat.h>
#include <sys/types.h>
#define CGROUP_FOLDER "/sys/fs/cgroup/pids/container/"

void limitProcessCreation() {
  // create a folder
  mkdir( CGROUP_FOLDER, S_IRUSR | S_IWUSR);

}
When we create this folder, cgroup automatically generates some files inside, those files describe the rules and states of the processes in that group, at the moment we don’t have any process attached.
/sys/fs/cgroup/pids/container/$ ls
cgroup.clone_children  cgroup.procs  notify_on_release  pids.current  pids.events  pids.max  tasks
To attach a process here we need to write the process identifier (PID) of our process to the file cgroup.procs.
#include <string.h>
#include <fcntl.h>

#define CGROUP_FOLDER "/sys/fs/cgroup/pids/container/"
#define concat(a,b) (a"" b)

// update a given file with a string value.
void write_rule(const char* path, const char* value) {
  int fp = open(path, O_WRONLY | O_APPEND );
  write(fp, value, strlen(value));
  close(fp);
}


void limitProcessCreation() {
  // create a folder
  mkdir( PID_CGROUP_FOLDER, S_IRUSR | S_IWUSR);

  //getpid() give us a integer and we transform it to a string.
  const char* pid  = std::to_string(getpid()).c_str();

  write_rule(concat(CGROUP_FOLDER, "cgroup.procs"), pid);
}
We’ve registered our process id, next we need to write to the file pids.max to limit the number of processes our children can create, let’s try with 5.
void limitProcessCreation() {
  // create a folder
  mkdir( PID_CGROUP_FOLDER, S_IRUSR | S_IWUSR);

  //getpid give us a integer and we transform it to a string.
  const char* pid  = std::to_string(getpid()).c_str();

  write_rule(concat(CGROUP_FOLDER, "cgroup.procs"), pid);
  write_rule(concat(CGROUP_FOLDER, "pids.max"), "5");
}
After our process has ended, it is a good idea to release the resources so the kernel can cleanup the container folder we created above, the way to notify this is to update the file notify_on_release with the value of 1.
void limitProcessCreation() {
  // create a folder
  mkdir( PID_CGROUP_FOLDER, S_IRUSR | S_IWUSR);

  //getpid give us a integer and we transform it to a string.
  const char* pid  = std::to_string(getpid()).c_str();

  write_rule(concat(CGROUP_FOLDER, "cgroup.procs"), pid);
  write_rule(concat(CGROUP_FOLDER, "notify_on_release"), "1");
  write_rule(concat(CGROUP_FOLDER, "pids.max"), "5");
}
Now our function is ready to be called from the main program:
int jail(void *args) {
  limitProcessCreation();
  #...
}
We need to call it before we change the root folder, this way we can setup the execution context. After we compile and run we should get something like this:
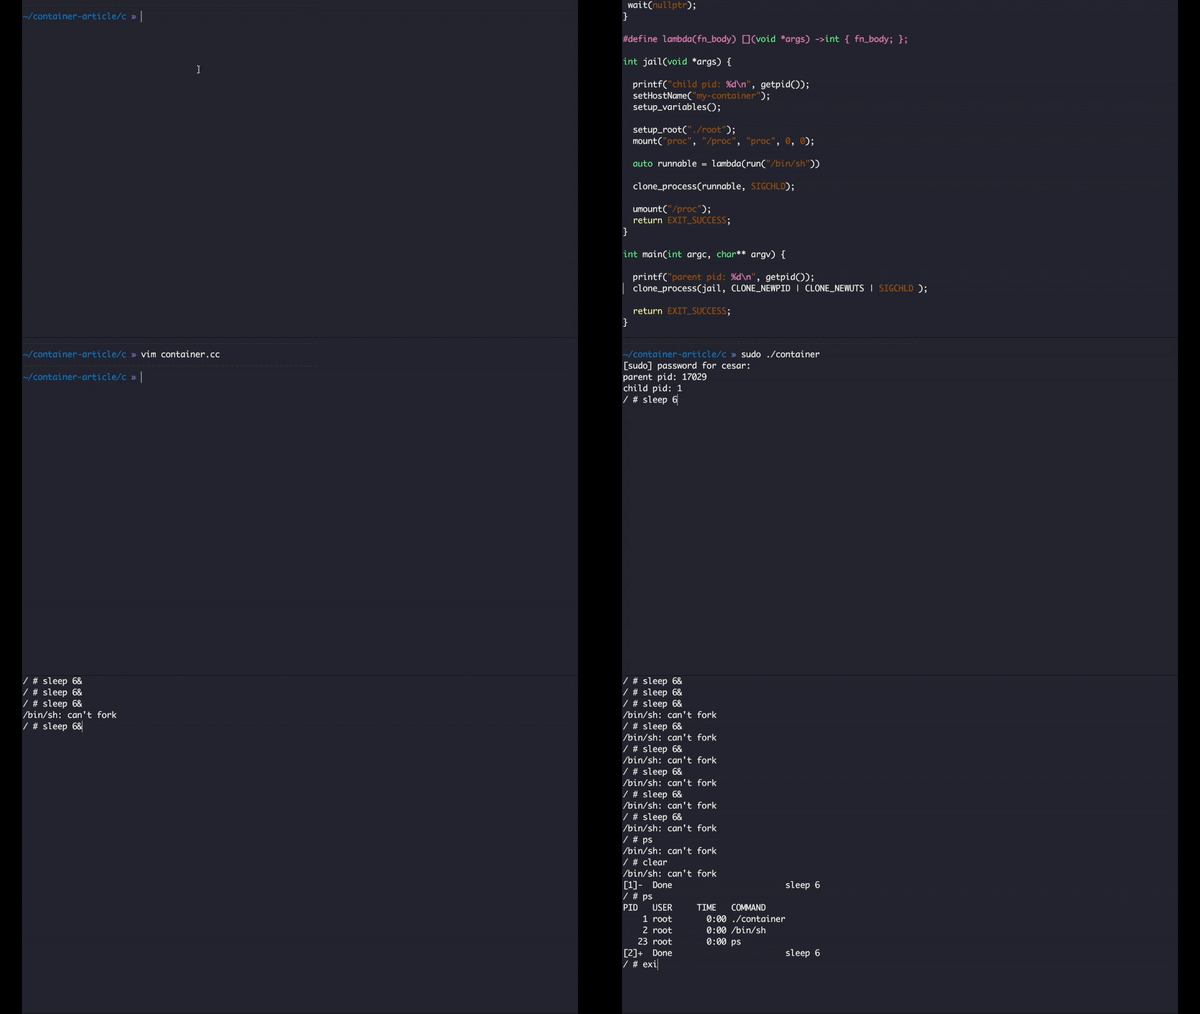
What I’m trying to do here is to execute an instance of the process sleep, this program requires an integer representing the number of seconds it will execute, I added the ampersand so that I can execute multiple instances of the program, when we hit the limit of 5, the system automatically refuses to create more processes as expected.
Wrapping Up
This was a long post, if you’ve read this far, I hope you have a better idea of what a container is and how they are created. After what we’ve learned so far we can answer some of the typical container questions:
How about performance ?
Yes they are just processes, you can control the how much each container consume by tweaking the cgroup rules. The major orchestrator like Openshift and Kubernetes offer an interface for this. After reading this article you should know how they achieve this trick :).
What’s the difference between VM and Containers ?
VM basically try to emulate a computer completely, including Bios, CPU, Memory,etc. While containers are just a special type of process.
Are containers faster than VM ?
It depends but in my opinion even when VM uses specials CPU instructions to get a very close to the metal speed, you’re still executing a bunch of OS libraries on top which I believe can add some overhead. While in the container you just (or you should) run only your process and it’s dependencies.
Can I use VM and containers ?
Why not? I used that combination to write this article. Well, in reality I don’t see any problem in using both, just an increase in complexity. In a perfect world I would use just containers.
Well, I hope it has been a very fun read or at least not boring. If you want access to the full source code you can get it from here. With time I’ll add more functionalities and maybe will rewrite some of it in Rust or DLango. If you want to learn more about cgroups you can access the documentation and if you have any improvements or add a new functionality let me know, you can contact me via Twitter or send a PR via Github. Happy hacking!.